Authorization templates allow you to define a common authorization method for many RESTful API datasources.
The saved template can be used many times to configure subsequent datasources that communicate with the same API system.
Creating an authorization template:
To create an authorization template, select the "Create authorization template" button on the datasource form:

Then a window will appear with the configuration of the authorization template:
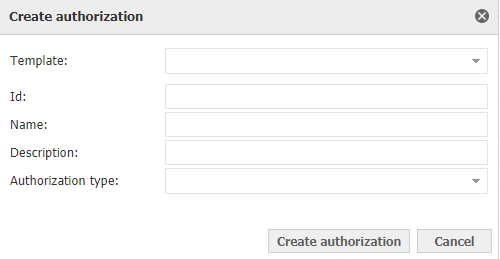
Description of the authorization template configuration:
| Name of the parameter | Description | Optionality |
|---|---|---|
| Template | It allows you to complete the configuration fields with one of the previously saved templates to speed up the configuration of many similar templates. | Not applicable |
| Id | Unique authorization template id. | Required |
| Name | Authorization template display name. | Required |
| Description | Displayed description of the authorization template. | Required |
| Authorization type | It allows you to choose one of the available authorization types supported by the plugin. After selecting the authorization type, additional configuration fields specific to it will appear on the form. The list of available authorization types is given below. | Required |
Available authorization types:
API Key
The API Key authorization template allows you to add a permanent API key to each request. The key can be added to the URL in the format - ?key=value - or to the header in the format { headers: { key: value } }
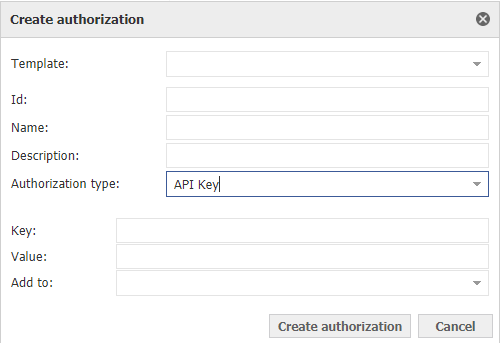
Configuration description:
| Name of the parameter | Description | Optionality |
|---|---|---|
| Key | URL parameter key or header name (depending on the "Add to" parameter) | Required |
| Value | URL parameter value or header value (depending on the "Add to" parameter) | Required |
| Add to | Specifies whether to add the key to the request as a URL parameter or as a header. | Required |
Configuration examples:
| Configuration | Result |
|---|---|
 | It will add the request parameter provided in the source configuration to the URL ?token=ASDF Eg. http://localhost:8080 => http://localhost:8080?token=ASDF |
 | It will add following header to the request "API-KEY: someConstantToken" |
Basic Auth
The Basic Auth authorization template allows you to add a Basic Auth header to each request in the form: Authorization: Basic {credentials}, where {credentials} is the Base64 value calculated from: {Użytkownik}:{Hasło}.
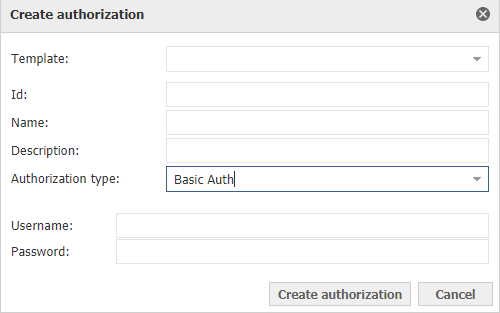
Configuration description:
| Name of the parameter | Description | Optionality |
|---|---|---|
| User | Name of the user registered in the API | Required |
| Password | User password | Required |
Bearer Token
The Bearer Token authorization template allows you to add a Basic Auth header to each request in the form: Authorization: Bearer {token}
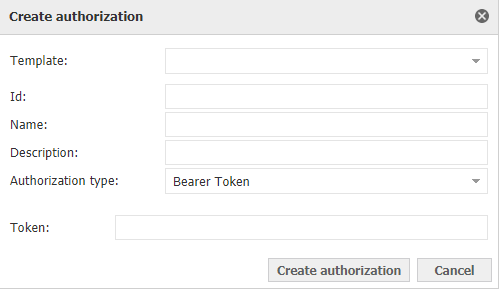
Opis konfiguracji:
| Name of the parameter | Description | Optionality |
|---|---|---|
| Token | The value of the token to be forwarder into the header | Required |
Cookie
The Cookie authorization template allows you to add to each request the cookie required to authorize the request.
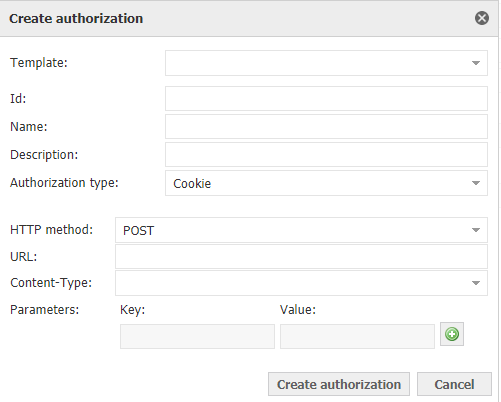
Opis konfiguracji:
| Name of the parameter | Description | Optionality |
|---|---|---|
| HTTP method | The HTTP method to be used in the request; possible values: [GET, POST] | Required |
| URL | The URL to which the request will be sent to receive cookies from the API | Required |
| Content-Type | Available only after selecting the POST method. Available values: application/json, application/x-www-form-urlencoded, multipart/form-data | Required |
| Parameters | Available only after selecting the POST method. Parameters passed in the body of the request. | Optional |
Configuration examples:
| Konfiguracja | Wynik |
|---|---|
 | Dołączy do żądań ze źródła danych ciasteczko autoryzacyjne z systemu PlusWorkflow |
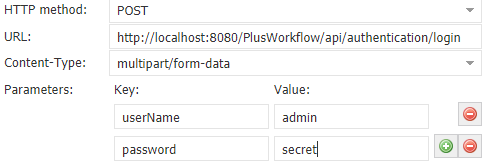 | Dołączy do żądań ze źródła danych ciasteczko autoryzacyjne z systemu PlusWorkflow |
OAuth2
Szablon autoryzacji OAuth2 umożliwia dodanie do każdego żądania tokena OAuth w postaci odpowiedniego nagłówka lub parametru adresu URL.
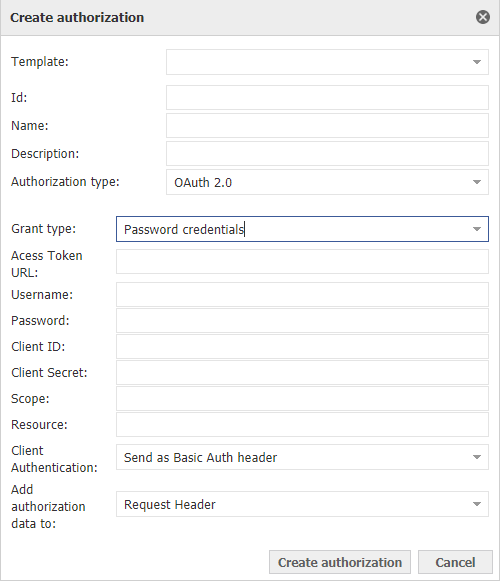
Opis konfiguracji:
| Nazwa parametru | Opis | Wymagalność |
|---|---|---|
| Grant type | Określa czy żądanie autoryzujące ma zawierać tylko sekrety klienta, czy również informacje o użytkowniku. Dostępne wartości:
| Wymagany |
| Access Token URL | Adres URL, pod który wysłane zostanie żądanie | Wymagany |
| Username | Nazwa użytkownika. Dostępny jedynie w przypadku, gdy parametr "Grant type" ustawiony zostanie na wartość "Password credentials" | Wymagany |
| Password | Hasło użytkownika. Dostępny jedynie w przypadku, gdy parametr "Grant type" ustawiony zostanie na wartość "Password credentials" | Wymagany |
| Client ID | https://www.oauth.com/oauth2-servers/client-registration/client-id-secret/ | Wymagany |
| Client Secret | https://www.oauth.com/oauth2-servers/client-registration/client-id-secret/ | Wymagany |
| Scope | Opcjonalny parametr określający do jakich zasobów ma zostać udzielony dostęp. Wartość parametru zależy od konkretnego rozwiązania API, do którego łączyć się będzie źródło danych | Opcjonalny |
| Resource | Opcjonalny parametr określający do jakich zasobów ma zostać udzielony dostęp. Wartość parametru zależy od konkretnego rozwiązania API, do którego łączyć się będzie źródło danych | Opcjonalny |
| Autoryzacja klienta | Określa w jaki sposób mają zostać przekazane dane autoryzujące (sekrety klienta). Dostępne wartości:
| Wymagany |
| Dodaj dane autoryzujące do | Określa w jaki sposób ma być przekazywany token autoryzujący (otrzymany w odpowiedzi na żądanie autoryzujące) przy kolejnych wywołaniach API. Dostępne wartości:
| Wymagany |
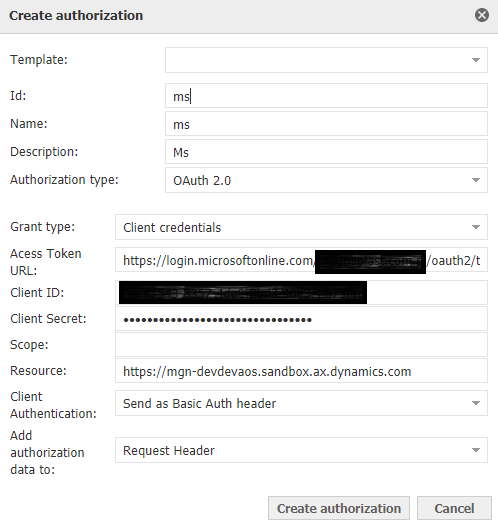
Przykład konfiguracji:
Modyfikacja szablonów autoryzacji
Szablony autoryzacji umożliwiają modyfikację wcześniej zapisanych szablonów. Aby tego dokonać należy na formularzy wybrać przycisk "Modyfikuj szablony autoryzacji".

Po kliknięciu ukaże się okno modyfikacji szablonu autoryzacji.
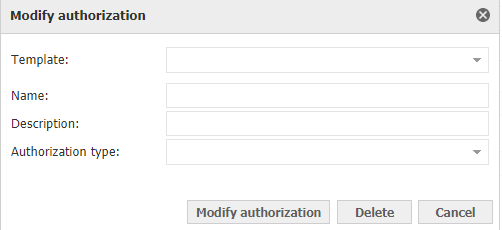
W otwartym oknie należy wybrać z listy rozwijanej zapisany szablon autoryzacji.
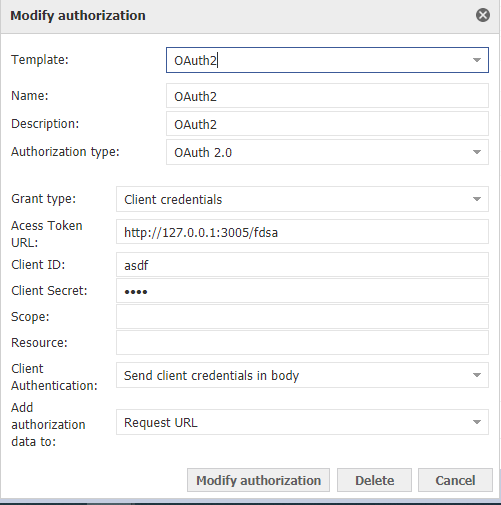
Po wybraniu szablonu formularz zostanie uzupełniony o dane w nim zapisane.
Po zakończeniu edycji danych należy wybrać przycisk "Modyfikuj szablon autoryzacji" w celu zapisania szablonu ze zmianami.
Nieużywany szablon można również usunąć z bazy za pomocą przycisku "Usuń".