Versions Compared

Key

  • This line was added.
  • This line was removed.
  • Formatting was changed.

Polish

 ← Powrót do listy dostępnych akcji

Info
Jeśli masz problem ze zrozumieniem jak działa akcja, sprawdź opisy: Akcja, Wykonanie warunkowe, Parametry komponentów
Panel
titlePodstawowe informacje

Kategoria: Dokumenty

Umiejscowienie akcji: Tabela, Przycisk tabeli

Poprzednie nazwy: Generowanie dokumentu (do wersji 1.0.33)

Dostępna od wersji : 1.0.3

Panel
titleOpis

Generuje dokument z podanego szablonu na podstawie aktualnych danych procesu. Przygotowanie szablonu dokumentu zostało opisane na stronie: Szablon DOCX do generowania PDF. Dokument może zostać dołączony do procesu w którym zostało wywołane zadanie automatyczne. Istnieje możliwość ustawienia własnej nazwy dla dokumentu i wybrania jednego z dwóch typów - PDF lub DOCX. Komponent pozwala na ustawienie wartości zmiennych w szablonie przy użyciu mapowania. Jeżeli zmienne w szablonie mają już odpowiadające im zmienne na formularzu, to przy użyciu tego komponentu możemy nadpisać te mapowania.

Panel
titleWywołanie akcji
Umiejscowienie akcjiDziałanie parametru "Wykonanie warunkowe"Warunek wywołania akcji
Przycisk formularza/akceptacjiUaktywnia/dezaktywuje wywołanie akcji po naciśnięciu przyciskuWciśnięcie przycisku (działa tylko do momentu dodania pierwszego komentarza przy pomocy wyświetlonego okna)
Panel
titleParametry konfiguracyjne
Nazwa parametruOd wersjiOpisTyp parametruWartość domyślnaRodzaj polaUwagi i ograniczenia
Format*1.0.3Format pliku, w jakim zostanie wygenerowany dokument.TekstPDFNieedytowalna lista rozwijalnaWartości do wyboru: PDF, DOCX
Podgląd*1.0.3Umożliwia użytkownikowi podejrzenie dokumentu po jego wygenerowaniuLogiczny Pole edytowalne 
Wiadomość*1.0.3Tekst wyświetlany podczas generowania dokumentu. W przypadku ustawienia parametru show na true, parametr ten nie jest wykorzystywany.Tekst Pole edytowalne 
Klasa dokumentów*1.0.3Nazwa klasy dokumentów, do której dodany zostanie wygenerowany dokument. Uwaga - w parametrze musi znaleźć się oryginalna nazwa klasy dokumentów, gdyż tłumaczenia nie są obsługiwane.
Tekst Edytowalna lista rozwijalna

Wartości do wyboru: <nazwy klas dokumentów dostępnych w systemie>

Można wpisać własną nazwę, ale jeżeli komponent nie znajdzie klasy w systemie to wyrzuca informację o błędzie.

Źródło szablonu*x.xOkreśla skąd zostanie pobrany szablon do wygenerowania dokumentu.TekstSzablon z procesuLista rozwijalna

Wartości do wyboru:

Wartość wyświetlanaWartość przekazywana
Szablon z procesu PROCESS_TEMPLATE 
Szablon z dokumentu podłączonego do procesuPROCESS_ATTACHED_DOCUMENT_TEMPLATE
Nazwa klasy dokumentu - szablonux.xParametr pojawia się, jeżeli wybrano "Szablon z dokumentu podłączonego do procesu" w parametrze "Źródło szablonu". Określa klasę, z której zostanie pobrany dokument - szablon. W przypadku istnienia kilku dokumentów aplikacja wyrzuci błąd.Tekst Pole edytowalne 
Szablon*1.0.3Nazwa szablonu generowanego dokumentu. Szablon powinien zostać załączony do procesu, w którym używamy zadania automatycznego. Sposób dodania szablonu został opisany tutaj (1.1.3)
Tekst Pole edytowalne

Jeżeli nie znajdzie szablonu w systemie komponent wyrzuca informację o błędzie.

Podłącz*1.0.3Podłącza wygenerowany dokument do procesu. LogicznyNieNieedytowalna lista rozwijalna 
Nowa wersja*1.0.3Zapisuje podłączony do procesu dokument jako nową wersję. Działa jedynie w przypadku, gdy do procesu jest dołączony dokładnie jeden dokument z tej samej klasy, z tymi samymi indeksami.
LogicznyNieNieedytowalna lista rozwijalna 
Nazwa dokumentu1.0.24Umożliwia podanie własnej nazwy generowanego dokumentu. W przypadku braku uzupełnienia tego parametru, system sam wygeneruje nazwę.Tekst Pole edytowalneJeżeli w nazwie znajdzie się "/" lub "\" komponent wyrzuca informację o błędzie.
Klucze do mapowania1.0.3Klucze z szablonu, które chcemy zmapować na odpowiednie wartości podane w "Wartościach mapujących". Np. dla wartości w szablonie: "@imie@" wpisujemy klucz "imie"Tablica wartości tekstowych Pole edytowalne 
Wartości mapujące1.0.3Wartości, które zapiszemy, bądź którymi nadpiszemy zmienne zadeklarowane w szablonie Tablica wartości tekstowych Pole edytowalne 
Umieszczenie pliku1.0.50Określa gdzie umieścić dokument - w archiwum, w procesie lub nigdzie (wtedy jedynie wyświetla dokument do podglądu - bez konieczności posiadania uprawnień do wyświetlenia pliku)TekstArchiwumEdytowalna lista rozwijalna 

Parametr*- pole wymagane

Panel
titlePrzykładowa konfiguracja

Panel
titlePrzykład zastosowania
Expand
titlePrzykład 1
Panel
borderWidth1
borderStylesolid
titlePrzykład

Niech naszą potrzebą będzie wygenerowanie faktury przy użyciu wartości pobranych z systemu Plusworkflow.

Przygotowanie szablonu dokumentu

W tym celu należy przygotować szablon, który umieścimy w naszym procesie faktur. Dokładny opis budowania szablonu znajduje się na stronie Szablon DOCX do generowania PDF, a w tym przykładzie użyjemy sobie następującego dokumentu:


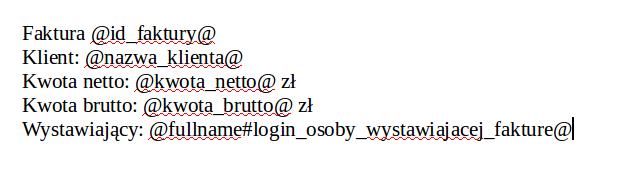
Mamy więc do czynienia z prostą fakturą, gdzie uzupełnić musimy identyfikator faktury, nazwę klienta któremu wystawiamy fakturę, kwotę netto, brutto, oraz imię i nazwisko osoby wystawiającej fakturę.

Szablon zapisujemy na dysku.

Dodanie zadania automatycznego i konfiguracja

Następnie na mapie procesu dodajemy zadanie automatyczne, które w odpowiednim momencie będzie generowało nam dokument. Wybieramy zakładkę "Dokumenty" a następnie "Generowanie dokumentu z szablonu".

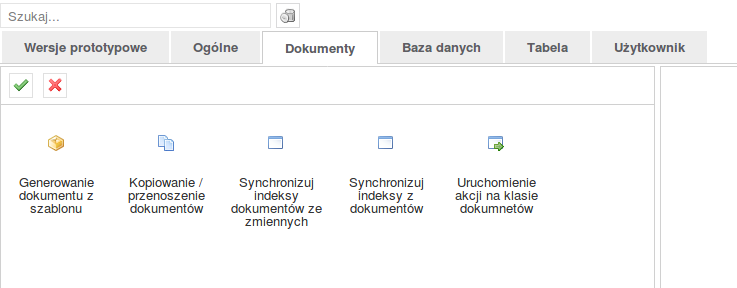
Czysta konfiguracja komponentu przedstawia się następująco:


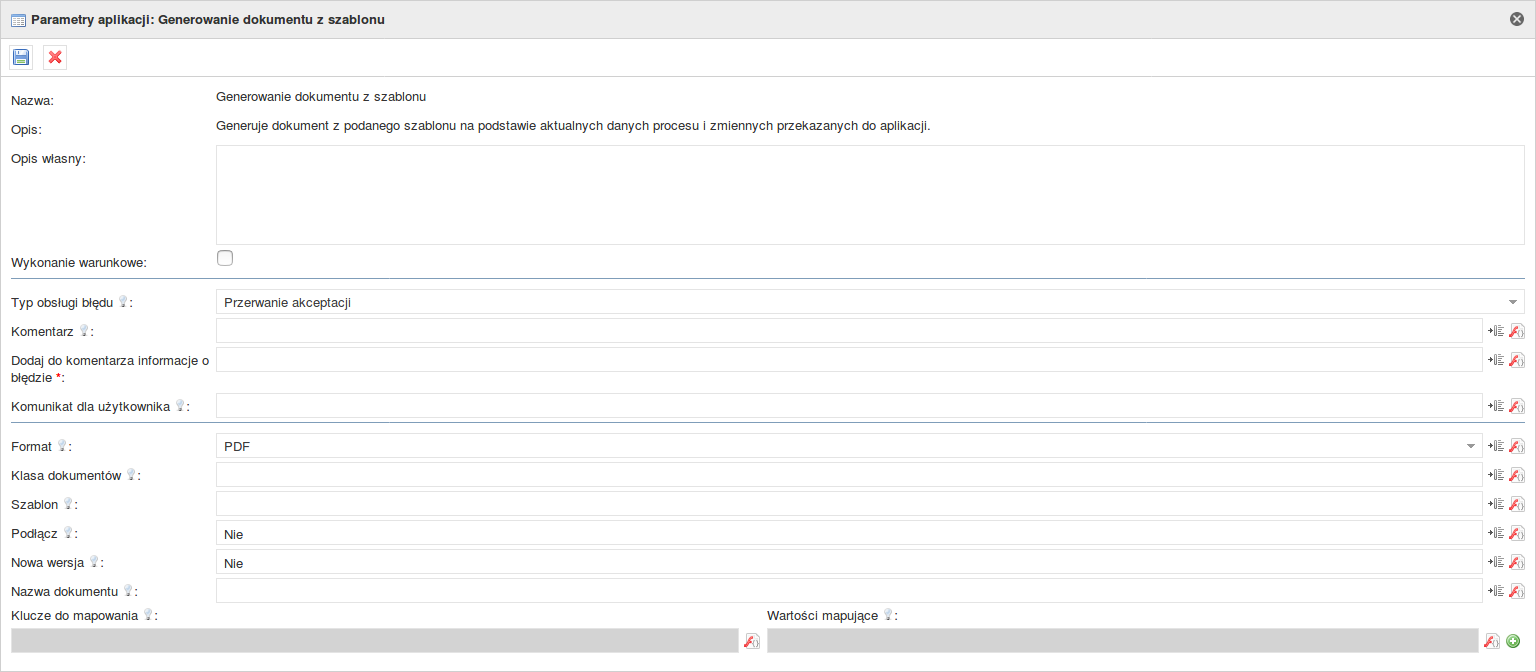
Przejdziemy teraz kolejno przez wszystkie parametry konfiguracyjne komponentu.

  • Format - nasz wybór ogranicza się do PDF i DOCX, a w naszym przykładzie zakładamy, że chcemy uzyskać dokument w formacie PDF. Zostawiamy wartość początkową.
  • Klasa dokumentów - musimy wybrać klasę dokumentów odpowiedzialną w naszym systemie za faktury. W tym przykładzie jest to klasa "Faktury".
  • Szablon - nazwa szablonu, na podstawie którego zostanie stworzony dokument. Póki co nie dodaliśmy go jeszcze do procesu, więc mamy wolną rękę w wyborze nazwy. W przykładzie szablon został nazwany "faktura_suncode".
  • Podłącz - Szablon ustala, czy chcemy, żeby nasz dokument został dołączony do procesu. Ustawiamy na "Tak"
  • Nowa wersja - Jeżeli pojawi się nowa wersja dokumentu o tej samej nazwie, to chcemy nadpisać starą wersję dokumentu zamiast dodawać nowy. Ustawiamy na "Tak".
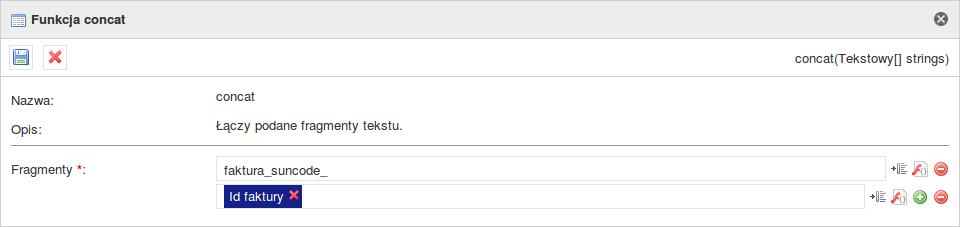
  • Nazwa dokumentu - W tym przykładzie zależy nam na tym, w jaki sposób zostanie nazwany dokument z fakturą. Chcemy, żeby kolejne faktury nazywały się "fakura_suncode_1", "fakura_suncode_2", "fakura_suncode_3" itd., gdzie 1, 2 i 3 to identyfikatory faktur. W tym celu skorzystamy z funkcji concat - łączącej ze sobą dane łańcuchy znaków. Pierwszą częścią łańcucha znaków będzie fraza "fakura_suncode_", a następną wartość ze zmiennej "Id faktury". Finalnie funkcja concat powinna prezentować się tak:
  • Kolejnym krokiem jest odpowiednie ustawienie mapowań, które przygotowaliśmy w szablonie dokumentu.
    - Id faktury oraz nazwę klienta mamy zapisane na formularzu w odpowiednich zmiennych. Mapowanie przebiega bezproblemowo:
    - Kwota netto oraz Kwota brutto występują na formularzu jako wartości zmiennoprzecinkowe. Chcąc wpisać je do parametru musimy je zamienić na łańcuch znaków. Ten problem rozwiązujemy przy użyciu funkcji toString(), która zamieni liczby na tekst.

    - Ostatnią wartością do ustawienia jest Wystawiający. W szablonie możemy zauważyć nietypową budowę dla tego mappingu:

    Jest to spowodowane faktem, że w tym konkretnym przypadku chcemy pobrać z formularza login użytkownika, a generator szablonów ma za zadanie zamienić go na imię i nazwisko tej osoby. Taki rezultat otrzymujemy przy użyciu "@fullname#<login użytkownika>@", gdzie w miejscu <login użytkownika> wpisujemy mapping z konfiguracji komponentu. W naszym przypadku mapping nazwany jest login_osoby_wystawiajacej_fakture, więc konfiguracja będzie prezentowała się następująco:

Finalnie nasza konfiguracja powinna prezentować się następująco:

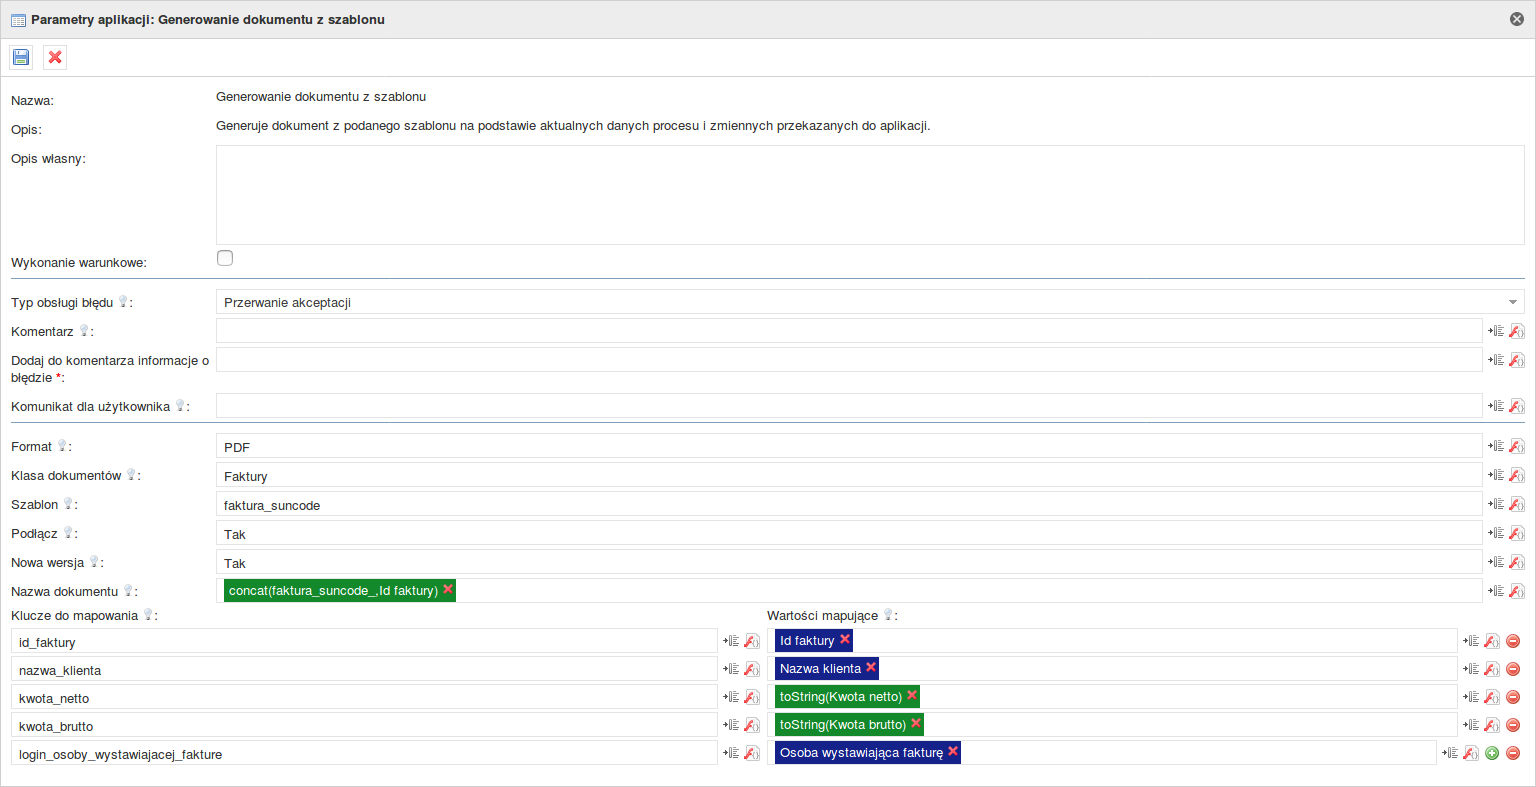
Taką konfigurację zapisujemy, zadanie automatyczne łączymy odpowiednio z innymi polami na mapie procesu, a następnie eksportujemy proces.

Dodanie szablonu do procesu

Teraz, gdy proces jest już wyeksportowany do systemu możemy przystąpić do dodawania szablonu. Wchodzimy w zakładkę Administracja ->Obieg dokumentów -> Procesy

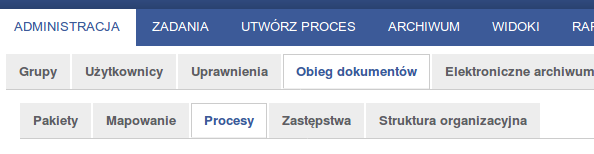
Na liście dostępnych procesów wyszukujemy proces, w którym umieściliśmy nasze zadanie automatyczne. Klikamy na przycisk "Edytuj" znajdujący się obok nazwy procesu.

W nowym widoku przechodzimy do zakładki "Szablony dokumentów".

Klikamy na przycisk "Nowy szablon". Uzupełniamy wartości w nowym oknie, podając nazwę z konfiguracji i ścieżkę pod którą zapisaliśmy plik z szablonem.

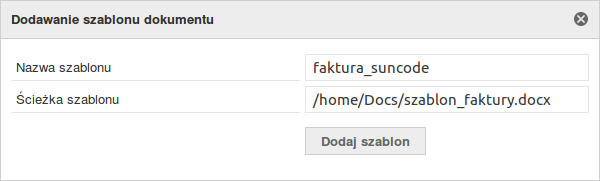
Naciskamy "Dodaj szablon". Gotowe.

Wywołanie zadania automatycznego

Wszystkie kroki niezbędne do skorzystania z zadania automatycznego zostały wykonane. Czas uruchomić proces i zapisać wartości w odpowiednich polach.

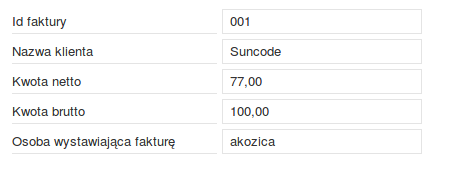
Po uzupełnieniu pól przechodzimy do zadania automatycznego, które wygeneruje dokument. W tym przypadku otrzymamy dokument o nazwie faktura_suncode_001.pdf, który zostanie dołączony do procesu. Wnętrze dokumentu powinno prezentować się następująco:

Panel
titlePakiet z przykładowym formularzem wykorzystującym akcję


View file
nameTesty komponentów - akcje - [AKCJA] Generowanie dokumentu z szablonu 2019-10-14 10_22_43.zip
height250

Panel
titleChange log

1.0.3

  • Dodanie komponentu 

1.0.11

  • Dodanie parametrów "Klucze do mapowania" i "Wartości mapujące"

1.0.23

  • Zmiana sekcji z "Ogólne" na "Dokumenty" 

1.0.24

  • Dodanie parametru "Nazwa dokumentu" 

1.0.33

  • Zmiana nazwy z "Generowanie dokumentu" na "Generowanie dokumentu z szablonu" 

1.0.43

  • Aktualizacja dynamicznego formularza
  • Usunięcie możliwości umieszczania akcji pod przyciskiem akceptacji

1.0.50  (obowiązująca dokumentacja)

  • Dodanie parametru "Umieszczenie pliku"

x.x (obowiązująca dokumentacja)

  • Dodanie parametru "Źródło szablonu"
Hide If
special@anonymous

Zadania związane z komponentem

Aktualne

Archwialne

JIRA
server192.168.1.52 JIRA
serverId2e6b42a8-62e1-3c71-bfe9-dbf183b33dc1
keyCUFCMP-13

JIRA
server192.168.1.52 JIRA
serverId2e6b42a8-62e1-3c71-bfe9-dbf183b33dc1
keyCUFCMP-51

JIRA
server192.168.1.52 JIRA
serverId2e6b42a8-62e1-3c71-bfe9-dbf183b33dc1
keyCUFCMP-209

JIRA
server192.168.1.52 JIRA
serverId2e6b42a8-62e1-3c71-bfe9-dbf183b33dc1
keyCUFCMP-141

JIRA
server192.168.1.52 JIRA
serverId2e6b42a8-62e1-3c71-bfe9-dbf183b33dc1
keyCUFCMP-400

JIRA
server192.168.1.52 JIRA
serverId2e6b42a8-62e1-3c71-bfe9-dbf183b33dc1
keyCUFCMP-256

JIRA
server192.168.1.52 JIRA
serverId2e6b42a8-62e1-3c71-bfe9-dbf183b33dc1
keyCUFCMP-504

JIRA
server192.168.1.52 JIRA
columnskey,summary,type,created,updated,due,assignee,reporter,priority,status,resolution
serverId2e6b42a8-62e1-3c71-bfe9-dbf183b33dc1
keyCUFCMP-653

English

 ← Return to the list of available actions

Info

If you have a problem understanding how the action works, check: ActionConditional ExecutionComponents parameters.

Panel
titleBasic information

Action location: Table, Table button

Available from version: 1.0.3

Previous names: Document generation (up to version 1.0.33) 

Category: Documents

Panel
titleDescription

Generates a document from the given template based on the current process data. Preparation of the document template is described on the page: DOCX template for generating PDF. The document can be attached to the process in which the automatic task was called. You can set your own name for the document and choose one of two types - PDF or DOCX. The component allows you to set variable values in the template using the mapping. If the variables in the template already have the corresponding variables on the form, then using this component we can overwrite these mappings.

Panel
titleAction call-up
Info

Leaving an empty conditional field is equal to setting it to "true".

Action location

Conditional execution parameter action

Action call-up condition

Form/acceptance button

Activates/deactivates the action call after pressing the button

Pressing the button (works only until the first comment is added using the window displayed)

Panel
titleConfiguration parameters
Parameter name From version 

Description

Paremeter type 

Default value

Field type

Comments and restrictions

Attach*1.0.3Attach the generated document to the process.LogicalNoNon-editable dropdown list 

Format

1.0.3

The file format in which the document will be generated.

Text

PDF

Non-editable dropdown list

Values to choose from: PDF, DOCX

Preview

1.0.3

It allows the user to preview a document after it has been generated

Logical


Editable field


Message

1.0.3

Message displayed when generating the document. If the show parameter is set to true this parameter is not used.

Text


Editable field


Document class

1.0.3

The name of the document class to which the generated document will be added. Note - the parameter must contain the original name of the document class as the translations are not supported.

Text


Editable dropdown list

Values to choose from: <names of document classes available in the system>

You can enter your own name, but if the component does not find a class in the system it will show an error message.

Template source*x.x
Specifies where the template for generating the document will be downloaded from.
TextTemplate from processNon-editable dropdown list

Values to choose from:

Display valueForwarded value
Template from processPROCESS_TEMPLATE 
Template from document attached to processPROCESS_ATTACHED_DOCUMENT_TEMPLATE
Document template class namex.x
The parameter appears if you selected "Template from a document connected to the process" in the "Template source" parameter. 
Specifies the class from which the document will be downloaded - the template. If there are several documents, the application will throw an error.
Text Editable field 

Template*

1.0.3

The name of the template of the generated document. The template should be attached to the process in which we use the automatic task. The method of adding the template has been described here(1.1.3)

Text


Editable field

If it does not find a template in the system, the component will show error message.

New version*

1.0.3

Saves the document attached to the process as a new version. It works only when exactly one document from the same class is attached to the process with the same indexes.

Logical

No

Non-editable dropdown list


Document name

1.0.24

Allows you to enter your own name of the generated document. If this parameter is not completed the system will generate the name itself.

Text


Editable field

If "/" or "\" is found in the name, the component will show error message.

Mapping keys

1.0.3

The keys from the template that we want to map to the appropriate values given in "Mapping Values". E.g. for the values in the template: "@ name @" enter the key "name"

Table of text values


Editable field


Mapping values

1.0.3

Values that we save or with which we overwrite the variables declared in the template

Table of text values


Editable field


Document placement

1.0.50

Specifies where to place the document - in the archive in the process or nowhere (then only displays the document for preview)

Text

Archive

Editable dropdown list


Parameter*- mandatory field

Panel
titleConfiguration example

Expand
titleExample 1
Panel
borderWidth1
borderStylesolid
titleExample

Let our need be to generate an invoice using values taken from the Plusworkflow system.

Document template preparation

To do this you need to prepare a template that will be placed in our invoice process. A detailed description of building a template can be found on DOCX Template page for generating PDFvand in this example we will use the following document:


We have to deal with a simple invoice where we have to complete the invoice identifier, name of the customer to whom we issue the invoice, net amount, gross amount, name and surname of the person issuing the invoice.

The template is saved to the disk.

Automatic task addition and configuration

Then, on the process map we add an automatic task that will generate the document at the right time. We choose the tab "Documents" and then "Generating a document from a template".

Empty configuration of the component is as follows:


We will now step by step walkthrough all of the configuration parameters of the component.

  • Format - our choice is limited to PDF and DOCX and in our example we assume that we want to get a PDF document. We leave the initial value.
  • Document class - we must select the class of documents responsible for invoices in our system. In this example, this is the "Invoices" class.
  • Template - the name of the template on the basis of which the document will be created. So far, we have not added it yet to the process so we have a free hand in choosing the name. In the example template was named "invoice_suncode".
  • Attach - The template determines whether we want our document to be included in the process. Set to "Yes"
  • New version - If a new version of the document with the same name appears, we want to overwrite the old version of the document instead of adding a new one. Set to "Yes".
  • Document name - In this example, we want to influence how the invoice document will be named. We want the new invoices to be called "invoice_suncode_1", "invoice_suncode_2", "invoice_suncode_3", etc., where 1, 2 and 3 are invoice IDs. To do this, we will use the concat function - which links the given character strings with each other. The first part of the string will be the phrase "invoice_suncode_", and the next value from the variable "Invoice Id". Finally, the concat function should look like this:

  • The next step is to properly set the mappings that we have prepared in the document template.
    - Invoice ID and customer name are saved on the form in the appropriate variables. Mapping works without any problems:
     
    - The net and the gross amount appears on the form as floating point values. If you want to enter them into the parameter you must replace them with a string. We can solve this problem using the toString () function which will convert numbers into text.  

    - The last value to be set is the Issuer. In the template, we can see an unusual construction for this mapping: 

    This is due to the fact that in this particular case we want to download the user's login form, and the template generator is tasked to replace it with the name and surname of the person. This result is obtained using "@ fullname # <user login> @", where in the place <user login> enter the mapping from the component configuration. In our case mapping is named invoice_issuer_login, so the configuration will be as follows: 

In result our configuration should look like this:

We save this configuration, connect the automatic task with other fields on the process map and then we export the process.

Adding a template to the process

Now that the process has been exported to the system we can start adding the template. Go to the Administration -> Document flow -> Processes tab.

In the list of available processes we search for a process in which we placed our automated task. We click on the "Edit" button next to the process name.

In the new view go to the "Document templates" tab.

We click on the "New template" button. We fill in the values in a new window giving the name from the configuration and the path under which we saved the template file.

We press "Add template". Done.

Automatic task call-up

All steps necessary to use the automatic task have been completed. Time to start the process and save the values in the appropriate fields.


After filling the fields we go to the automatic task that will generate the document. In this case we will receive a document called invoice_suncode_001.pdf which will be attached to the process. The body of the document should look like this:

Panel
titleChange log

1.0.3

  • Adding a component

1.0.11

  • Adding the parameters "Mapping keys" and "Mapping values"

1.0.23

  • Changing the section from "General" to "Documents"

1.0.24

  • Adding the "Document name" parameter 

1.0.33

  • Changing the name from "Generating a document" to "Generating a document from a template"

1.0.43

  • Update of the dynamic form
  • Removal of the option of placing actions under the acceptance button

1.0.50 (applicable documentation)

  • Adding the "Document placement" parameter

x.x (applicable documentation)

  • Adding "Template source" parameter