Zestawy dokumentów


Zestawy dokumentów, to zestawy, które łączą ze sobą dwie klasy dokumentów w jedną, spójną całość. Wiązanie odbywa się na powiązaniu wspólnych indeksów w dwóch różnych klasach, np. indeks kod kreskowy w klasie A i indeks kod kreskowy w klasie B. Dzięki zestawom możemy wyszukiwać dwa, powiązane ze sobą dokumenty.


Po wejściu w Administracja --> Elektroniczne archiwum --> Zestawy dokumenty pojawi się następujący widok:

Rysunek 6.4.1 powyższy widok przedstawia tabelę z utworzonymi zestawami dokumentów.

Tabela z listą zestawów, posiada kolumny "Nazwa zestawu", "Opis zestawu", "Akcja" w której możemy usuwać lub edytować wybrane zestawy. Listę zestawów możemy eksportować do formatów CSV, XLS, XML, PDF, RTF.

Dodawanie zestawu dokumentów

W celu dodania nowego zestawu, należy kliknąć na przycisk "Nowy zestaw" (patrz rysunek 6.4.1). Po kliknięciu przycisku pojawi się poniższy formularz:

Rysunek 6.4.2 przedstawia formularz dodania nowego zestawu dokumentów.

W celu dodania nowego zestawu danych należy podać nazwę dodawanego zestawu oraz jego opis. Następnie należy kliknąć na przycisk "Dodaj zestaw dokumentów".


Uwaga! Dodanie nowego zestawu danych nie jest równoznaczne z jego prawidłowym działaniem! Zestaw dokumentów będzie działał prawidłowo w momencie w którym zostanie utworzone powiązanie indeksów między klasami dokumentów.


Edycja zestawu dokumentów

Rysunek 6.4.3 przedstawia widok po wejściu w edycję zestawu dokumentu.

Po dodaniu nowego zestawu należy go wyedytować tak, aby możliwe było korzystanie z zestawu. W tym celu należy kliknąć na przycisk "Edytuj" przy wybranym zestawie dokumentów (patrz rysunek 6.4.1).
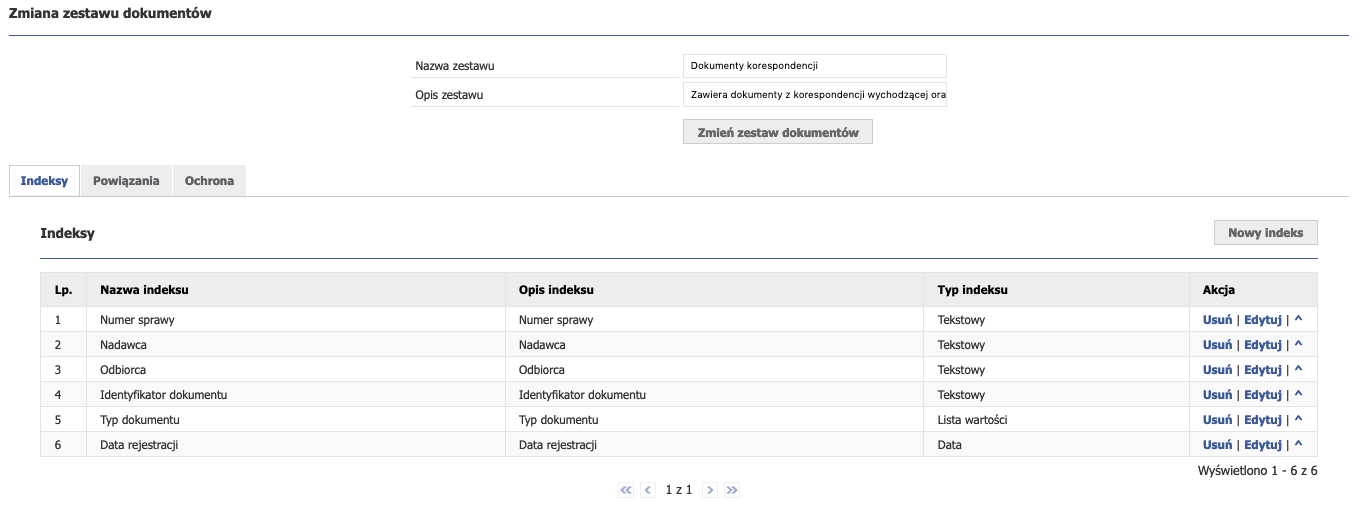
W trybie edycji pojawi się formularz podobny do formularza dodawania nowego zestawu dokumentów, z tą różnicą, że pola nazwa i opis będą wypełnione wartościami. Jeśli chcemy zmienić nazwę lub opis, należy wpisać nową wartość w odpowiednie pole i zatwierdzić zmianę klikając w przycisk "Zmień zestaw dokumentów" (patrz rysunek 6.4.3). Pod formularzem znajdują się trzy zakładki: "Indeksy", "Powiązania" oraz " Ochrona", które odpowiednio oznaczają:

Indeksy zestawu dokumentów

Rysunek 6.4.4 przedstawia zakładkę "Indeksy" w formularzu zmiany zestawu dokumentu.

Indeksy działają na takiej samej zasadzie jak indeksy klasy dokumentów (patrz "Indeksy klasy dokumentów" w Klasy dokumentów). W zestawie dokumentów dodajemy indeksy, które chcemy powiązać między dwoma klasami dokumentów. W tym celu należy kliknąć na przycisk "Nowy indeks" (patrz rysunek 6.4.4).  Po kliknięciu przycisku pojawi się formularz dodawania nowego indeksu:

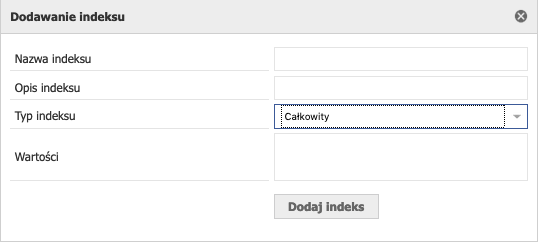
Rysunek 6.4.5 przedstawia formularz dodawania indeksu.

Jak widać na powyższym rysunku, aby dodać indeks, musimy wypełnić następujące pola:

  • Nazwa indeksu - zalecaną nazwą jest taka sama nazwa indeksu co w klasie dokumentów, np. w klasie A indeks "Kod kreskowy" i w klasie B "Kod kreskowy", w zestawie również "Kod kreskowy",
  • Opis indeksu - dowolny opis,
  • Typ indeksu - lista wartości: całkowity, zmiennoprzecinkowy, tekstowy, data, data i czas, lista wartości oraz logiczny. Typ indeksu musi być identyczny do tego który jest w klasie dokumentów, np. "Kod kreskowy" jest typu tekstowego, w zestawie również musi to być typ tekstowy,
  • Wartości - w tym polu możemy zdefiniować domyślną wartość indeksu, np. w wypadku gdyby dany indeks był pusty w klasie dokumentów.

Po uzupełnieniu wszystkich wartości należy kliknąć przycisk "Dodaj indeks" (patrz rysunek 6.4.5). Czynność dodawania indeksu powtarzamy tyle razy, ile chcemy mieć wyświetlanych danych.


Powiązania

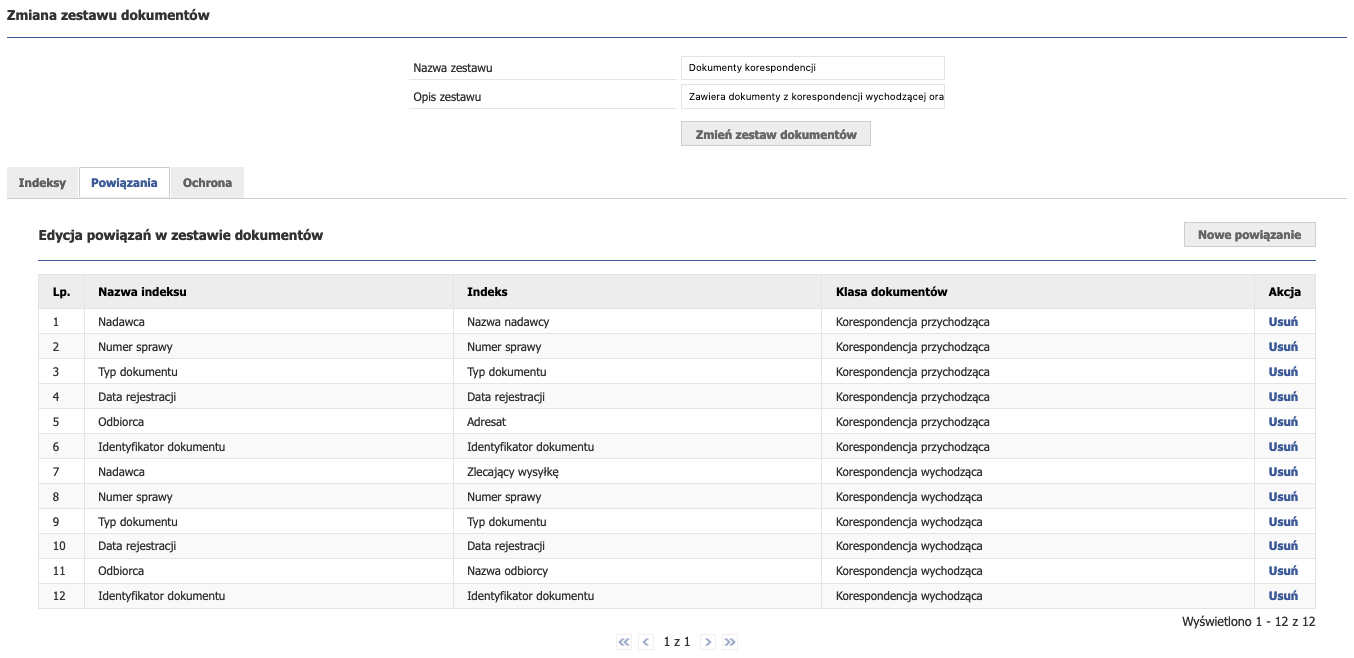
Rysunek 6.4.6 przedstawia tabelę z powiązanymi indeksami w klasach dokumentów.

W zakładce powiązania dokonujemy powiązania indeksów klas dokumentów, które wcześniej zdefiniowaliśmy w zakładce indeksy. W celu powiązania indeksów, należy kliknąć na przycisk "Nowe powiązanie" (patrz rysunek 6.4.6). Pojawi się formularz dodawania nowego indeksu:


Rysunek 6.4.7 przedstawia formularz dodawania powiązania indeksów z klasą dokumentów.

Ważne! W celu powiązania indeksów, należy najpierw utworzyć indeksy w zakładce "Indeksy". W przeciwnym wypadku system pozwoli wybrać tylko klasę dokumentu i nie będziemy w stanie powiązać indeksów. Jeśli nie dodamy żadnych indeksów formularz dodawania nowych powiązań będzie wyglądał następująco:

Jeśli wcześniej dodaliśmy indeksy w zakładce "Indeksy" i chcemy utworzyć nowe powiązanie, pojawi się nam formularz (patrz rysunek 6.4.7) w którym wyświetlane są "Nazwa indeksu" oraz nazwy indeksów które wcześniej utworzyliśmy. System potrafi samodzielnie przypisać indeksy z klasy dokumentów, jeśli utworzone indeksy w zestawie dokumentów mają taką samą nazwę oraz taki sam typ jak indeksy w wybranej klasie dokumentów. Jeśli jednak indeksy w zestawie dokumentów i zestawy w klasie dokumentów mają inną nazwę, należy je wybrać ręcznie, np. indeks z zestawu dokumentów o nazwie "Nadawca" należy dopasować ręcznie do indeksu w klasie dokumentów o nazwie "Nazwa nadawcy". Ważnym jest, abym pilnować nazw indeksów w zestawie dokumentów. Jeśli będziemy posiadać indeksy o tej samej nazwie i o tym samym typie, co indeksy w klasie dokumentów, to system sam rozpozna indeksy i je powiąże, co bardzo ułatwi nam pracę.
Należy również pamiętać, aby zestaw dokumentów nie posiadał większej ilości indeksów niż powiązane klasy dokumentów.

Ochrona

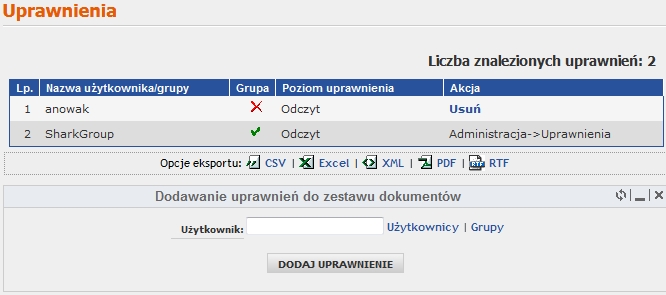
Rysunek 6.4.8 przedstawia widok w zakładce "Uprawnienia".

Na rysunku 6.4.8 przedstawiona została tabela z dodanymi uprawnieniami dla grup oraz użytkowników. Tabela zawiera kolumny takie jak:

  • Nazwa użytkownika/grupy - nazwa użytkownika bądź grupy, którzy mają uprawnienia do wyświetlania danego zestawu
  • Grupa - w kolumnie tej znajduje się informacja czy uprawnienie posiada grupa czy użytkownik
  • Poziom uprawnienia - kolumna ta zawiera informacje nt. tego jaki poziom uprawnienia ma dana grupa lub użytkownik
  • Akcja - umożliwia edycję bądź usunięcie danego uprawnienia. Jeśli w kolumnie tej znajduje się zapis "Administracja -> Uprawnienia" to oznacza to, że uprawnienia zostały nadane globalnie (patrz Zarządzanie uprawnieniami) i to tam należy ew. usunąć uprawnienia do zestawów dokumentów.


Rysunek 6.4.9 przedstawia formularz dodawania nowego uprawnienia.

W celu dodania nowego uprawnienia należy kliknąć przycisk "Nowe uprawnienie". Pojawi się formularz dodawania nowego uprawnienia (patrz rysunek 6.4.9). Jak widać na rysunku możemy dodać uprawnienie dla użytkownika bądź grupy. Gdy chcemy dodać użytkownika kilkamy na ikonę (). Następnie będzie widoczna lista użytkowników, którzy istnieją w systemie. Wybieramy użytkownika i klikamy na przycisk "Wybierz". Formularz dodawania uprawnienia wypełni się loginem użytkownika, którego uprzednio wybraliśmy. Zapisać uprawnienie możemy za pomocą przycisku "Dodaj uprawnienie" (patrz rysunek 6.4.9). Analogicznie dodajemy uprawnienie dla grupy, lecz w tym wypadku kilkamy na przycisk ().

Usuwanie zestawu dokumentów

Każdy zestaw dokumentów możemy usunąć za pomocą przycisku "Usuń" w kolumnie "Akcja" (patrz rysunek 6.4.1). Po kliknięciu na przycisk "Usuń" system zażąda odpowiedzi czy jesteśmy pewni. W tym celu klikamy na przycisk "Ok'.


Document sets


Document sets combine two classes of documents into one coherent whole. Binding is done by linking common indexes in two different classes, e.g. bar code index in class A and bar code index in class B. Thanks to sets you can search two related documents.


After entering Administration -> Electronic archive -> Document sets the following view will appear:

Figure 6.4.1 above view shows a table with created sets of documents.

The table with the list of sets has the columns "Set name", "Set description", "Action" in which you can delete or edit selected sets. The set list can be exported to CSV, XLS, XML, PDF, RTF formats.

Adding a document set

To add a new set, click on the "New set" button (see figure 6.4.1). After clicking the button, the following form will appear:

Figure 6.4.2 shows the form for adding a new set of documents.

To add a new data set, enter the name of the set being added and its description. Then click on the "Add Document Set" button.

Attention! Adding a new data set is not the same with its proper operation! The document set will work correctly when the index association between the document classes is created.


Editing a set of documents

Figure 6.4.3 shows the view after entering the document set edition.

After adding a new set, you must edit it so that you can use the set. To do this, click on the "Edit" button next to the selected set of documents (see Figure 6.4.1).

In edit mode, a form similar to the form for adding a new set of documents will appear, except that the name and description fields will be filled with values. If you want to change the name or description, enter the new value in the appropriate field and confirm the change by clicking the "Change document set" button (see Figure 6.4.3). Under the form there are three tabs: "Indexes", "Relation" and "Protection", which respectively mean:

Document set indexes

Figure 6.4.4 shows the "Indexes" tab in the document set change form.

Indexes work in the same way as document class indexes (see "Document class indexes" in Document classes ). In the document set, we add indexes that we want to link between two document classes. To do this, click on the "New index" button (see Figure 6.4.4). After clicking the button, a form for adding a new index will appear:

Figure 6.4.5 shows the add index form.

As you can see in the figure above, to add an index, you need to fill in the following fields:

  • Index name - the recommended name is the same index name as in the document class, e.g. class A index "Bar code" and class B "Bar code", also included "Bar code",
  • Index description - any description,
  • Index type - list of values: total, floating point, text, date, date and time, list of values and logical. The index type must be identical to the one in the document class, e.g. "Bar code" is a text type, in the set it must also be a text type,
  • Values - in this field we can define the default index value, e.g. in case the given index was empty in the document class.

After completing all the values, click the "Add Index" button (see Figure 6.4.5). The procedure of adding the index is repeated as many times as you want to have the data displayed.

Relations

Figure 6.4.6 shows a table with associated indexes in document classes.

In the links tab we link the indexes of document classes that we have previously defined in the indexes tab. In order to link indexes, click on the "New link" button (see Figure 6.4.6). The form for adding a new index appears:

Figure 6.4.7 shows the form for adding index association to a document class.

Important! To link indexes, you must first create indexes on the "Indexes" tab. Otherwise, the system will allow you to select only the document class and you will not be able to link indexes. If you don't add any indexes, the form for adding new bindings will look like this:

Jeśli wcześniej dodaliśmy indeksy w zakładce "Indeksy" i chcemy utworzyć nowe powiązanie, pojawi się nam formularz (patrz rysunek 6.4.7) w którym wyświetlane są "Nazwa indeksu" oraz nazwy indeksów które wcześniej utworzyliśmy. System potrafi samodzielnie przypisać indeksy z klasy dokumentów, jeśli utworzone indeksy w zestawie dokumentów mają taką samą nazwę oraz taki sam typ jak indeksy w wybranej klasie dokumentów. Jeśli jednak indeksy w zestawie dokumentów i zestawy w klasie dokumentów mają inną nazwę, należy je wybrać ręcznie, np. indeks z zestawu dokumentów o nazwie "Nadawca" należy dopasować ręcznie do indeksu w klasie dokumentów o nazwie "Nazwa nadawcy". Ważnym jest, abym pilnować nazw indeksów w zestawie dokumentów. Jeśli będziemy posiadać indeksy o tej samej nazwie i o tym samym typie, co indeksy w klasie dokumentów, to system sam rozpozna indeksy i je powiąże, co bardzo ułatwi nam pracę.

If we have previously added indexes in the "Indexes" tab and want to create a new link, a form will appear to us (see Figure 6.4.7) in which "Index name" and the names of indexes you have created previously are displayed. The system can independently assign indexes from a document class if the created indexes in the document set have the same name and type as the indexes in the selected document class. However, if the indexes in the document set and sets in the document class have a different name, they must be selected manually, e.g. the index from the document set called "Sender" must be manually matched to the index in the document class called "Sender Name". It is important to keep an eye on the index names in the document set. If you have indexes with the same name and type as the indexes in the document class, the system will recognize the indexes and bind them, which will make our work much easier.

Also, make sure that the document set does not have more indexes than the associated document classes.

Protection


Figure 6.4.3 shows the view in the "Permissions" tab.

In the table in the figure we can see added permissions for the edited document sets. The "Group" column determines whether the permission applies to a group or a user. Whereas the "Action" column allows you to delete and edit permissions added only from this level. For permissions added globally (see Authorization management) we have information in the form of "Administration -> Permissions". With such rights, we cannot do anything here because they are only informative. The table shows that the user "anowak" has the permission to search for documents belonging to the document classes assigned to this set. They were given to him here. This permission can be removed using the "Delete" button. The second permission is for the "SharkGroup" group. They were given in global rights.

Beneath the table there is a form for adding rights to the edited set. Choose a user or group. Selection is done using the "Users" or "Groups" buttons. After pressing the first button you will see a window with the user selection (see Figure 2.3 and its description in Groups management). After pressing the "Groups" button, a window with group selection will open (see Figure 3.2 and its description in User management). Finally, we add the permission using the "Add permission" button. 

Deleting a set of documents

Each set of documents can be deleted using the "Delete" button in the "Action" column (see Figure 6.4.1). After clicking the "Delete" button, the system will ask you if you are sure. To do this, click on the 'Ok' button.